
Quality assurance and development teams, as well as software engineers, often use Jira Software as a bug reporting tool to track and effectively manage software bugs. One of Jira’s most powerful features is the workflow - the defined path an issue takes from creation to completion. A perfect bug workflow ensures every bug is documented, assigned, tracked, and resolved, allowing teams to report bugs efficiently before they disrupt the development cycle.
In this guide, we’ll explore the main components of a Jira bug workflow, how to create one, best practices to follow, common pitfalls to avoid, and how to save time and ensure maximum efficiency with Jira's planning features that support workflow management.
What Is a Bug Tracking System?
A bug tracking system is software that identifies, documents, tracks, and resolves issues throughout the development lifecycle. A dedicated bug tracking project in Jira helps organize and manage these issues. These platforms offer:
- Structured Bug Recording: Ensuring issues are logged consistently and designed for efficiently capturing bugs. Issues can represent various work items, including project tasks and request forms.
- Efficient Assignment: Helping teams swiftly delegate to the right person.
- Root Cause Analysis: Providing transparency into where and why defects occur.
- Preventing Regressions: Ensuring resolved issues don’t resurface.
Modern bug tracking systems, like Jira, integrate seamlessly with development tools, enabling advanced features such as automated notifications, customizable workflows, and root cause analysis. Jira offers a wide range of tools and customization options to fit different project needs. By keeping all issues centralized in a backlog, you can prioritize them effectively, balance new development with bug fixes, and align with broader project objectives.

Setting Up Your Jira Project
Setting up a Jira project for bug tracking is the first step toward managing bugs effectively throughout your software development lifecycle. Begin by creating a new Jira project or selecting an existing project that aligns with your team’s needs. Choose a project template designed for software development or bug tracking to ensure you have the right structure in place from the start.
Next, configure your project settings, paying special attention to the issue type screen scheme. This ensures that bug reports are categorized correctly and tracked consistently. Create custom issue types, such as “Software Bug” or “Defect,” to distinguish bugs from other project tasks. Define all the relevant fields, including severity level, description, and steps to reproduce, so that every bug report contains the information your team needs to resolve issues quickly.
Finally, set up a custom workflow tailored to your bug tracking process. Define the statuses and transitions that reflect your team’s bug workflow, such as “Open,” “In Progress,” “Resolved,” and “Closed.” By customizing your Jira project in this way, you can manage bugs more efficiently, track their progress, and ensure that every software bug is addressed in a timely manner.
Creating a Dedicated Bug Tracking Board
A dedicated bug tracking board in Jira is essential for visualizing and managing the flow of bugs across your team. Start by creating a new board—either Scrum or Kanban—specifically for bug tracking. Configure the board to display only bug-related issues, allowing your team to focus on tracking and resolving bugs without distraction from other project tasks.
Organize the board with columns or swimlanes that represent each stage of your bug workflow, such as “To-Do,” “In Progress,” and “Done.” This setup makes it easy for team members to track the progress of each bug, quickly identify bottlenecks, and spot areas where the process can be improved. Enhance your board by adding custom fields like priority or severity, giving your team additional context to help prioritize bugs and allocate resources effectively.
By maintaining a dedicated bug tracking board, you streamline the process of tracking bugs, ensure that nothing slips through the cracks, and empower your team members to resolve issues efficiently throughout the entire software development process.
Advantages of Bug Tracking Software
1. Efficient Identification and Recording of Bugs
Bug tracking tools provide a centralized platform for identifying, logging, and tracking defects. This structured approach avoids duplicates, minimizes miscommunication, and ensures consistent issue tracking. For instance, Jira can integrate with error monitoring tools to automatically generate bug tickets - reducing manual steps and capturing essential data like screenshots, error logs, and severity levels.
2. Improved Workflow Management
Different bugs have different levels of impact. A minor UI glitch may not be as critical as a security vulnerability or a crash-inducing bug. Jira allows you to create custom priority levels and labels (e.g., Critical, High, Medium, Low) and easily fold those into sprint planning or release cycles. This helps teams focus on high-impact issues first, ensuring a smooth and efficient workflow. Jira supports the entire team's workflow from bug identification to resolution, making it especially valuable for agile projects where quick prioritization and transparency are essential.
3. Effective Bug Assignment
Quickly assigning bugs to the relevant developer or QA engineer is crucial. With Jira’s automation features, you can create rules that automatically assign incoming bugs based on specific criteria (e.g., module owner, severity level). Assigning bugs to the right team members and the correct person ensures efficient defect tracking and resolution. This reduces administrative overhead and speeds up the resolution process.
4. Comprehensive Backlog Overview
Having a detailed backlog overview is vital for maintaining control over project progress. Managing the team's backlog in Jira allows for clear prioritization of bugs and tasks, ensuring the team works on the highest priority items efficiently. Jira’s dashboards and reporting features give managers a holistic view of issues - bugs, feature requests, or improvements. This visibility ensures no bug slips through the cracks, and critical issues are tackled first. Balancing bug fixes with new features development is also streamlined, supporting agile projects and helping teams deliver value continuously.
5. Lifecycle Tracking and Status Monitoring
Every bug goes through multiple statuses, from “Open” to “Closed.” Jira’s end-to-end visibility makes sure each bug is tracked at every stage. Teams can analyze real-time progress, identify bottlenecks, and enable better collaboration by highlighting dependencies and blockers.
6. Increased Efficiency through Automation
Automation in bug tracking tools significantly reduces manual tasks - such as assigning issues, sending notifications, or updating statuses - allowing teams to concentrate on resolving issues. Jira can automatically update a bug's status and send notifications in real-time as code changes and bug fixes progress, enhancing workflow efficiency. Many actions, like setting up automations or integrations, can be completed in just a couple of clicks or just a couple of minutes. Jira’s rules can also automatically generate reports, schedule updates, and notify the right people when certain triggers occur (e.g., when a bug remains unassigned for too long).
7. Integration with Development & Collaboration Tools
Jira integrates with popular version control and CI/CD platforms (e.g., GitHub, Bitbucket, Jenkins) and communication tools (e.g., Slack, Microsoft Teams). Developers can link bug tickets to code commits or pull requests, ensuring that context is preserved. Automatic notifications in Slack or Teams reduce context-switching and accelerate bug resolution.
8. Detailed Documentation
Comprehensive documentation is crucial for efficient bug resolution. Jira’s custom fields allow teams to capture extra data like impact level, related feature requests, or technical details. When bugs are well-documented, developers and QA teams spend less time on clarifications.
Jira Workflow Explained
A Jira workflow defines a set of statuses and transitions that an issue (bug, task, story) goes through from creation to completion. Depending on your project’s purpose, you can modify or create custom workflows to fit your team’s processes.
Here are common workflow categories along with typical statuses:
- Bug Tracking Workflow
- Custom statuses could include:
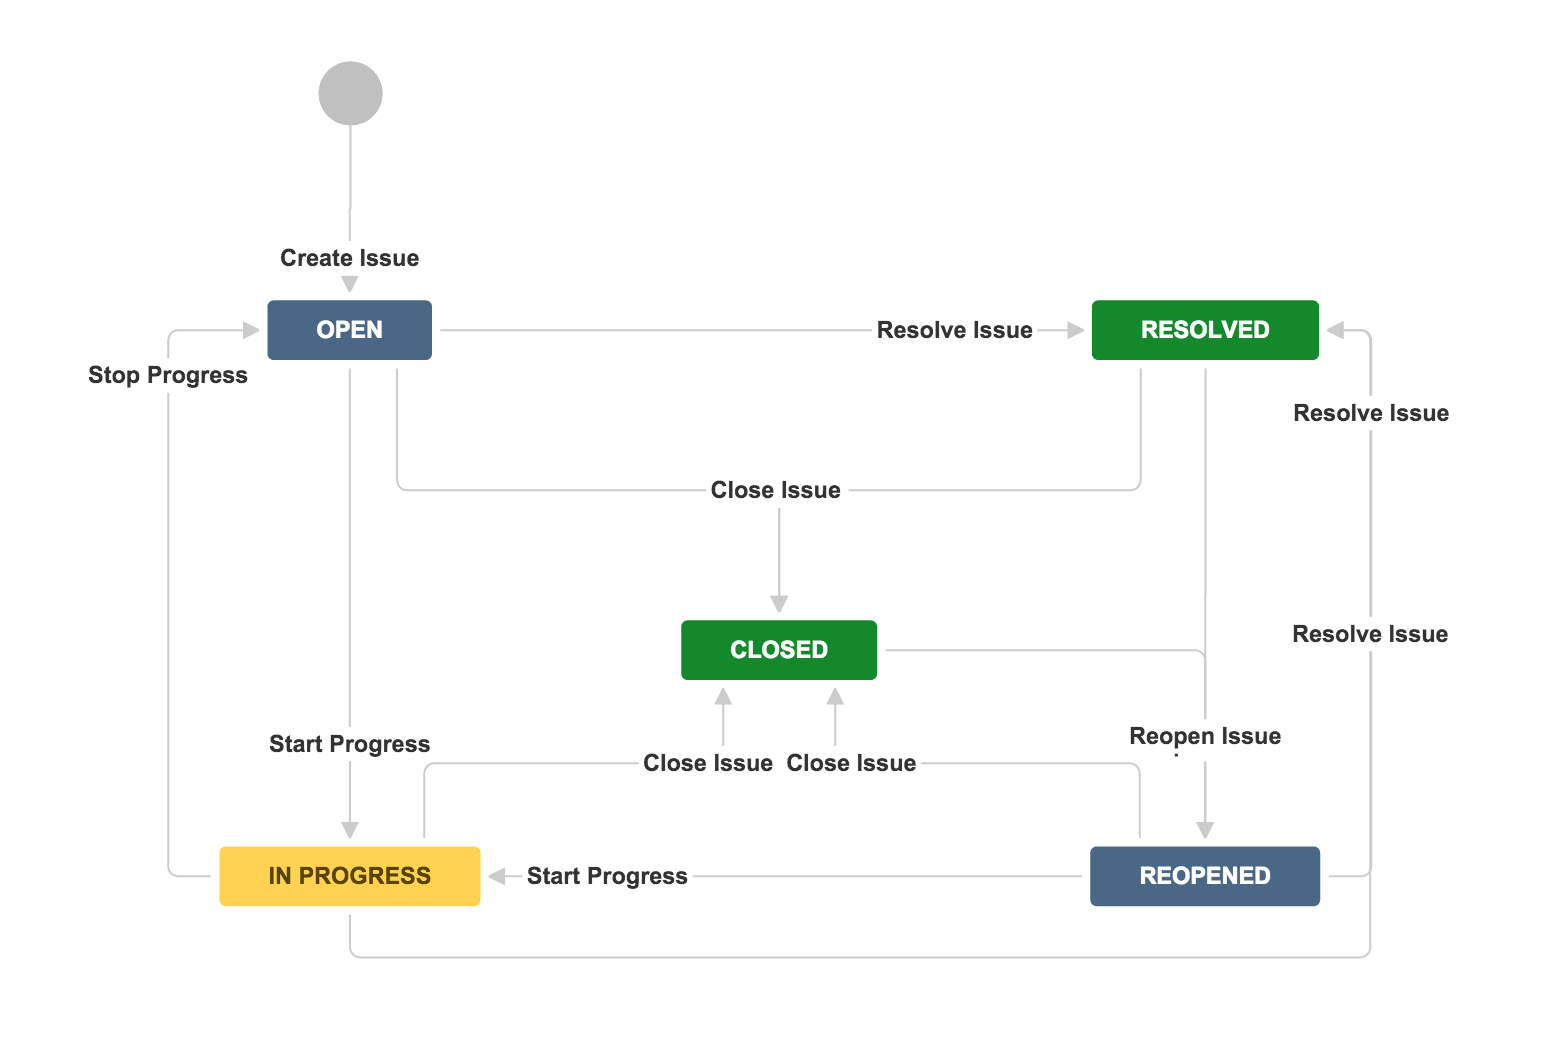
Reported→Under Investigation→Fixed→Verified. - Note that Jira’s default statuses are typically
Open,In Progress,Resolved,Closed, andReopened. You can rename or add new statuses to meet QA/testing needs.
- Custom statuses could include:
- Agile Development Workflow
- Often includes statuses like:
Backlog→To Do→In Progress→In Review→Done.
- Often includes statuses like:
- Service Management Workflow (in Jira Service Management)
- Commonly includes statuses such as:
Waiting for Support→Waiting for Customer→Escalated→Resolved/Closed.
- Commonly includes statuses such as:
- Content Creation Workflow
- For marketing, documentation, or content teams:
Writing→Editing→Approved→Published.
- For marketing, documentation, or content teams:
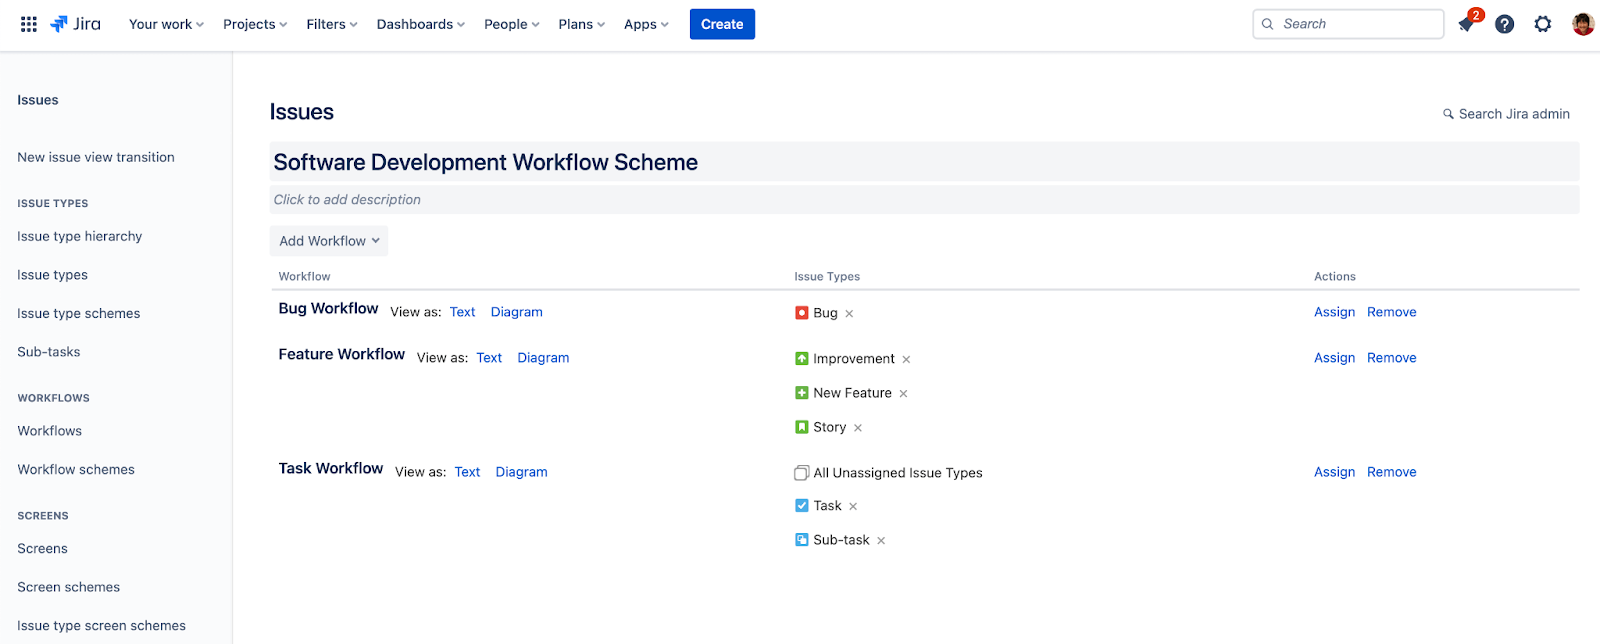
Relating Jira Workflows to Issue Type
In Jira, workflows are linked to issue types using a workflow scheme. A single project can have multiple workflows, and one workflow can be shared by multiple projects. While different issue types (e.g., Bugs, Tasks, Stories) can share a workflow, each issue type can only be associated with one workflow at a time. For example, a Jira bug report follows a specific workflow designed to track its progress from identification to resolution. To make your workflow active, attach it to a workflow scheme and associate that scheme with a project. Workflow schemes play a crucial role in capturing bugs efficiently by ensuring that each bug is properly tracked and managed throughout its lifecycle. You can also create custom fields for each issue type to capture specific details, automate processes, and enhance your team's ability to handle and prioritize bugs.
How to Track Bugs in Jira
Below are five primary steps to create an effective bug management workflow in Jira:
1. Capture Bugs
- Log the defect as a Jira bug report and create a Jira ticket with key details (description, steps to reproduce, severity, attachments). Make sure to report bugs accurately and provide clear descriptions so developers understand the issue.
- If you’re using error monitoring tools, configure them to automatically create bug tickets in Jira.
- Standardize your bug templates using a third-party app like Issue Templates for Jira Cloud that lets you reuse existing issues and populate variables. This ensures every new bug ticket has consistent fields and structured data right from the start.
2. Prioritize Bugs and Determine Impact
- Assign priority labels (High, Medium, Low) or custom fields for urgency.
- Use Jira’s filters and dashboards to monitor each bug status and measure how each defect impacts overall timelines and goals. Track how a bug moves through the workflow for better prioritization.
3. Assign Related Tasks and Notify Stakeholders
- Assign bugs to the right team members, the correct person, or software engineers responsible for fixing the issue.
- Use Jira’s mention feature (
@username) to ensure prompt collaboration. - Configure automation rules to automatically update assignments and notify watchers and stakeholders about status changes, escalations, or new comments.
4. Identify the Source of Defects
- Link bugs to code commits or related tasks to establish a root cause. Connect the bug to a new branch in your version control system to track code changes related to the fix.
- Use Jira’s issue-linking feature to connect bugs to the requirements or user stories that caused them.
- Document patterns or trends to reduce the chances of repeating similar issues.
5. Check Test Coverage
- Verify that bug fixes resolve the original problem without causing regressions.
- Integrate testing tools or link a test case directly to the bug in Jira, and involve the QA team in verification.
- Use automation or manual gating steps to ensure each bug must pass QA checks before being moved to “Resolved” or “Closed.”
Real-Life Example
Scenario: Your team is building an e-commerce site. A QA engineer discovers that the “Add to Cart” button stops working under certain browser conditions.
- Capture: A new Jira bug ticket is created (via a standard bug template) with detailed reproduction steps, browser versions, and screenshots.
- Prioritize: Because the bug affects core purchasing functionality, it’s labeled High Priority.
- Assign: Jira automation assigns the issue to the right team members, ensuring the correct person - such as the software engineers who recently worked on checkout features - receives the notification
- Identify Source: On investigation, the bug is tied to a recent JavaScript library update. The assigned software engineer creates a new branch in the source control system to work on the fix.
- Test Coverage: After the fix, QA tests across various browsers. The bug transitions from
Open→In Progress→Resolved→Closed.
This story-based flow shows the end-to-end use of Jira in bug discovery, triage, resolution, and verification.
Creating a Bug Tracking Workflow in Jira
To begin, you need to create project in Jira Software. Set up a dedicated bug tracking project to streamline your defect management process. Jira Software provides robust planning features that help you organize workflows, prioritize tasks, and manage the end-to-end development process. During setup, Jira offers a range of tools for workflow customization, including the ability to create custom fields to capture specific bug details and automate processes.
Below is a step-by-step process to set up a Jira workflow specifically for bug tracking. Note that navigation paths can differ between Jira Cloud and Jira Server/Data Center.
Step 1: Define Your Bug Life Cycle
Identify the typical phases a bug goes through in your organization, focusing on the bug's status at each step and how the bug moves through the workflow. For instance:
- Open: The bug's status is set to "Open" when it is first reported. This is the initial stage where the bug enters the tracking system.
- In Progress: As the bug moves to the next phase, its status changes to "In Progress" when a developer starts working on it. Jira can automatically update the bug's status when work begins, reflecting real-time progress.
- Resolved: Once the developer completes the fix, the bug's status moves to "Resolved." At this point, the QA team is notified to validate the fix. Jira can automatically update the status as the bug moves from development to QA validation.
- Closed: After the QA team verifies the fix, the bug's status is updated to "Closed," indicating no further action is needed. This transition can also be automatically updated in Jira.
- Reopened: If the bug reappears or fails verification, the bug moves back to the "Open" status, restarting the cycle.
Step 2: Create a New Workflow
- Jira Cloud: Go to Settings (gear icon) > Issues > Workflows to access the workflow setup options that Jira offers, including planning features to help organize and manage your software development process.
- Jira Server or Data Center: Go to Jira Administration > Issues > Workflows to utilize Jira's planning features and a range of customization options.
- Click Add Workflow, name it, and provide a description. During workflow customization, you can create custom fields to track specific bug details and enhance your team's bug tracking and prioritization.
Step 3: Add Statuses and Transitions
Use the workflow editor to:
- Add the custom statuses (e.g., “Open,” “In Progress,” “Resolved,” “Closed,” “Reopened”) so that each bug's status is clearly defined.
- Create transitions to define how a bug moves from one status to another throughout the workflow.
- Label transitions clearly (e.g., “Start Work,” “Resolve Issue,” “Close Issue”).
Step 4: Configure Conditions, Validators, and Post Functions
- Conditions: Restrict who can transition an issue (e.g., only a QA lead or the correct person can transition from “Resolved” to “Closed”).
- Validators: Enforce rules (e.g., a developer must fill out the “Fix Version” field before resolving). Validators can also require that the QA team is involved in certain transitions to maintain quality standards.
- Post Functions: Automate repetitive tasks (e.g., notify watchers, automatically update fields or statuses, or assign the bug to QA after resolution).
Step 5: Link Your Workflow with a Project
- Create or Edit a Workflow Scheme under Settings > Issues > Workflow Schemes (Cloud) or Jira Administration > Issues > Workflow Schemes (Server/Data Center).
- Assign your newly created workflow to the Bug issue type.
- Associate this workflow scheme with the desired Jira project.
Best Practices for Bug Tracking in Jira
- Empower Your Team with Correct Information
- Jira users should use standardized bug report templates to capture essential fields (e.g., reproduction steps, environment details) and report bugs clearly so developers understand the issue. Accurate bug reporting is especially important in agile projects to ensure efficient resolution.
- Quickly Assign and Prioritize Bugs
- Automate assignments based on severity, components, or modules.
- Set up notifications so the right person is instantly informed of new or critical bugs.
- Ensure Timely Resolution
- Map out statuses like
Open,In Progress,Awaiting QA,Closed. - Track resolution time or SLA metrics to adjust your workflow if delays occur.
- Map out statuses like
- Automate Wherever Possible
- Use Jira Automation to handle repetitive tasks.
- Automatically notify stakeholders, transition statuses, or escalate overdue issues.
- Integrate with Development Tools
- Connect Jira to version control (e.g., GitHub, Bitbucket) so commits link back to bug tickets.
- Use error monitoring tools to create issues automatically with relevant data (stack traces, logs).
Common Pitfalls to Avoid
- Forgetting to Update Statuses
- Bugs can remain stuck in “Open” or “In Progress” if team members don’t actively update Jira. Use automation or regular check-ins to ensure statuses are accurate.
- Overcomplicating Workflows
- Resist adding too many statuses or transitions. Keep it simple and relevant to your team’s needs, or you’ll slow down your process.
- Lack of Standardization
- Without consistent bug reporting (e.g., missing steps, no environment details), developers will spend extra time clarifying. Enforce a template to capture must-have details - this is where our 3rd-party app can help.
- Ignoring Team-Managed vs. Company-Managed Differences
- Team-managed projects have simpler workflow configurations, while company-managed projects support more advanced workflow schemes. Pick the right project type from the start.
- No Root Cause Documentation
- Fixing the bug is good; preventing repeats is better. Document how and why each bug happened to refine processes and reduce recurring issues.
Conclusion
Creating the perfect bug workflow in Jira is an ongoing process. It starts with identifying the statuses a bug should follow - from Open to Closed - and establishing clear transitions and automation. Comprehensive bug documentation reduces miscommunication and accelerates resolution, while tracking key metrics like resolution time helps identify bottlenecks.
By continually refining your bug workflow, automating repetitive tasks, and integrating Jira with development tools, your team can maintain a streamlined process that prevents issues from slipping through the cracks. Finally, a well-designed Jira workflow boosts team efficiency, improves software quality, and fosters a more collaborative development environment.
Pro Tip: Start small. Set up a basic workflow, test it with your team, and incrementally add complexity (custom statuses, automation rules, integrations) based on actual needs and feedback. This iterative approach ensures your Jira bug workflow remains both effective and user-friendly.

